Configure dashboard settings
ADVANCED TOOLS
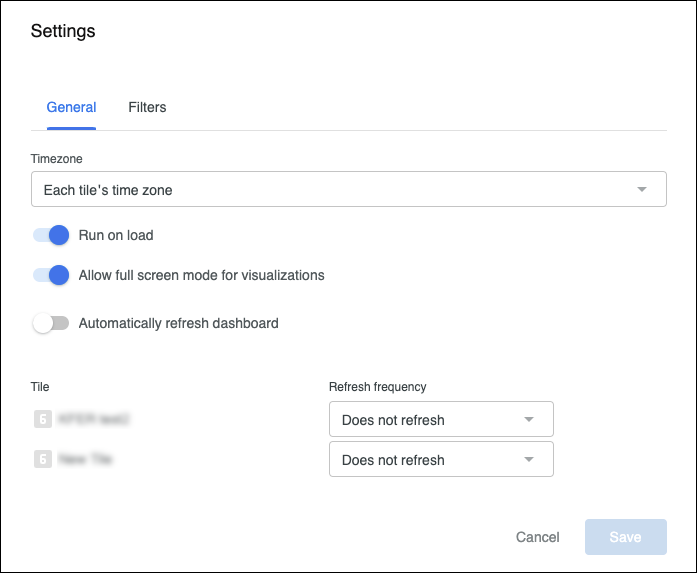
You can configure the following settings:
Timezone
Run on load
Full screen visualizations
Automatic refresh
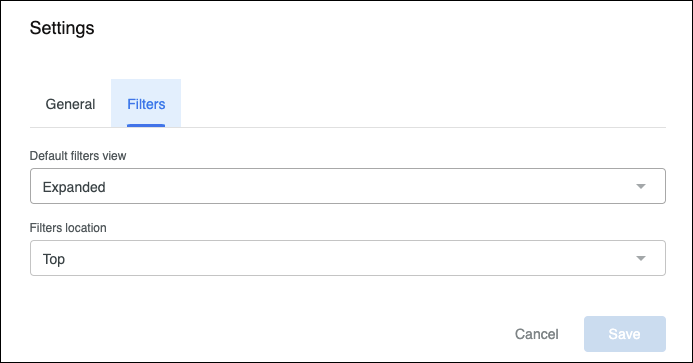
Default filters view
To configure settings, put the dashboard in Edit mode and click Settings in the toolbar.

Timezone
Specify the time zone in which your dashboard will be run.
The following options are available:
(Default) Each tile's time zone runs all the tiles in the time zone in which they were saved
Viewer time zone runs all tiles in the viewer's time zone
Run on load
Turn the toggle on/off to specify when you want to run all queries on the dashboard. The following options are available:
(Default) Enabled Dashboard data automatically loads when the dashboard is first loaded.
Disabled Dashboard doesn't display any data until you click the Reload icon.
Allow full screen visualizations
This value is enabled by default. Disabling this option prevents viewers from seeing the View option in the Dashboard controls and prevents them from seeing dashboard tiles in full-screen or expanded formats.
Automatically refresh
To ensure dashboard data is always up-to-date, you may opt to automatically refresh the data on a regular schedule. You can set auto-refresh frequencies for an entire dashboard or for individual tiles. This option is disabled by default.
Auto-refresh a dashboard and all tiles
Enable the Automatically refresh dashboard toggle.
Using the dropdowns, specify a refresh frequency to automatically update the dashboard and all its tiles.
To use a different refresh frequency for an individual tile, make specific adjustment in the Tiles section of this window.
Click Save.
Auto-refresh individual tiles only but not the entire dashboard
Disable the Automatically refresh dashboard toggle (if previously enabled).
In the Tile section of the window, ensure that the Refresh frequency is set to Does not refresh by default.
Select Refresh every… and set the desired frequency (whole numbers only).
For any tiles you do not want to auto-refresh, leave the setting as Does not refresh.
Click Save.
The auto-refresh intervals begin at the time of day you turn on the feature, and the dashboard refreshes on the interval you set if it is open in a browser tab and not in Edit mode.
If the dashboard is closed or in Edit mode during a scheduled refresh time, it won't refresh, and the refresh interval restarts as soon as the dashboard is reopened or leaves Edit mode.
EXAMPLE It’s 8:33 a.m. when you set a daily refresh. The dashboard refreshes the next day at 8:33 a.m. and again each following day at 8:33 a.m. However, one day you enter Edit mode at 9:02 a.m. and exit edit mode at 9:45 a.m. From then on, the daily refresh occurs at 9:45 a.m. Auto-refresh works regardless of whether Run on load is enabled or disabled. If Run on load is disabled and you open a dashboard with auto-refresh settings, the refresh interval begins upon opening regardless of whether you click Reload to load the data initially. |
|---|
About auto-refresh and performance
Frequent dashboard updates, especially on large dashboards, can place a significant strain on some database systems. At a minimum, avoid setting a refresh interval that is shorter than your database update interval, as there would be no new data to refresh and this would trigger unnecessary queries.
Likewise, when multiple users access a dashboard with auto-refresh, it may impede performance. To display your dashboard on a shared screen while multiple users simultaneously access it, you can create two identical dashboards and configure only the dashboard on the shared screen to refresh automatically.
Find more information and recommendations about building performant dashboards in the ↗️ (Looker documentation) Considerations when building performant Looker dashboards.
Default filters view
On the Filters tab of the Settings window, select one of the following options:

(Default) Expanded The filter bar shows on page load and filters are shown by default.
Collapsed The filter bar doesn't show on page load and filters are hidden by default.
Click Save to save the change.
If you change the setting to Collapsed, you must exit Edit mode and refresh the dashboard to see your change.
Dashboard viewers can temporarily switch the filter bar between collapsed and expanded by clicking the filters icon. However, only the Default filters view setting permanently changes the default state of the filter bar.
