End-to-end QA testing
To ensure that the installed tracking pixels are behaving as expected, you’ll need to perform end-to-end QA testing. This page walks you through the process of setting up and conducting end-to-end QA testing.
Required tools
You’ll need the following tools to perform end-to-end testing.
TVScientific Pixel Chrome Extension
Chrome Developer Tools
Last 100 Events report in Peacock Ad Manager
Best practices
Test with multiple browsers — we recommend Google Chrome, Mozilla Firefox, and if possible, Apple Safari.
When testing in each browser, open the developer tools before testing and switch to the Network panel.
If possible, temporarily pause all extensions running in your browser, or use fresh browser profiles to test.
Don’t test in incognito mode.
Use the tvScientific Pixel Chrome Extension
Use this extension to quickly browse website pages and determine which specific pixel is firing.
This method doesn’t work for Shopify integrations. Please see Use Developer tools instead.
This method requires the Google Chrome browser.
This extension doesn’t capture button fires, so you’ll have to use Chrome Developer Tools for QA on button pixels.
Download and install the TVScientific Pixel Chrome Extension.
Navigate to the page on the website where you want to verify the pixels.
Open the extension.
Click Check Pixels. Pixels that are firing are displayed.
Use Developer tools
Developer tools provide a comprehensive look at which pixels are firing and the parameters being pulled. It provides a more detailed look at your pixel implementation than the tvScientific Chrome Extension.
This method is required for button and image pixels.
In your preferred browser, click the 3 vertical dots in the browser bar.
Choose the navigation path:
Google Chrome: click More Tools > Developer Tools > Network tab
Firefox: click Developer Tools > Network Monitor
Safari: click Develop > Developer tools > Network tab
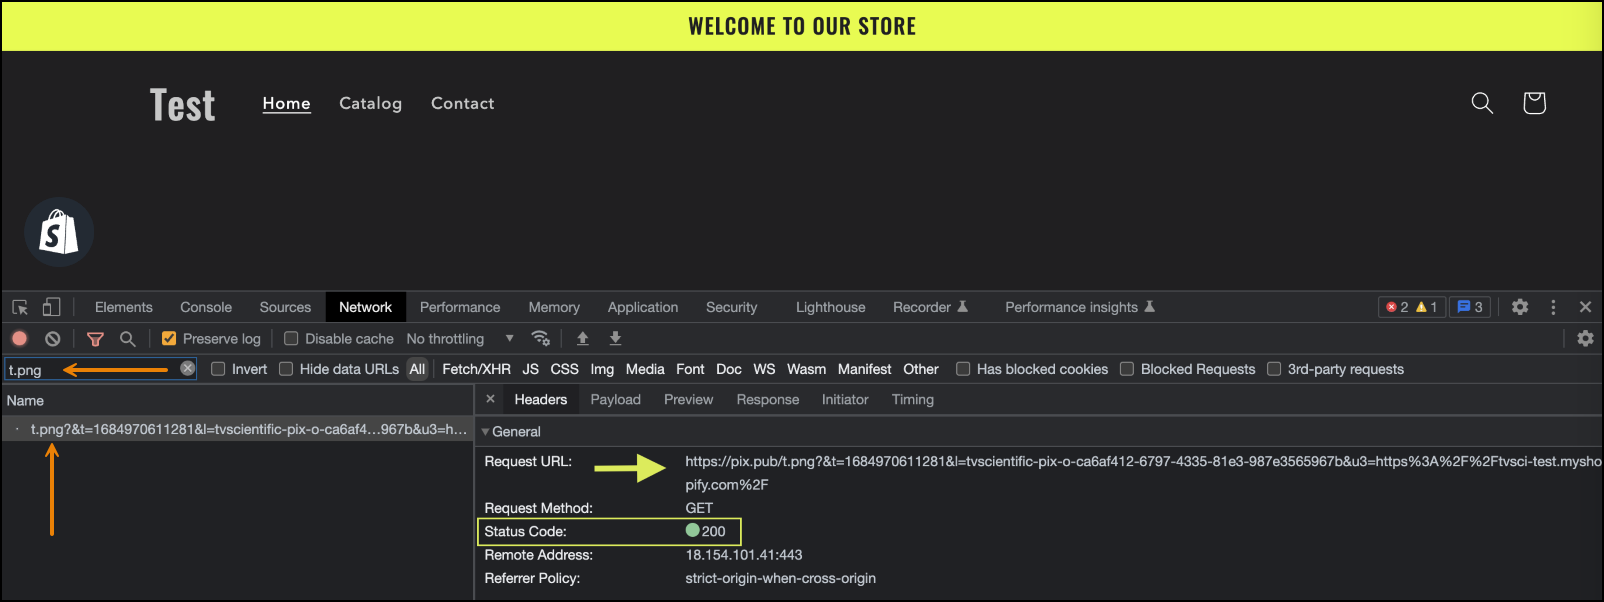
In the Filter field, type
t.pngto isolate the specific pixel fires.In the results, click the tvScientific network request and look for the status code 200. This means that the site visit pixel fired without any problems.

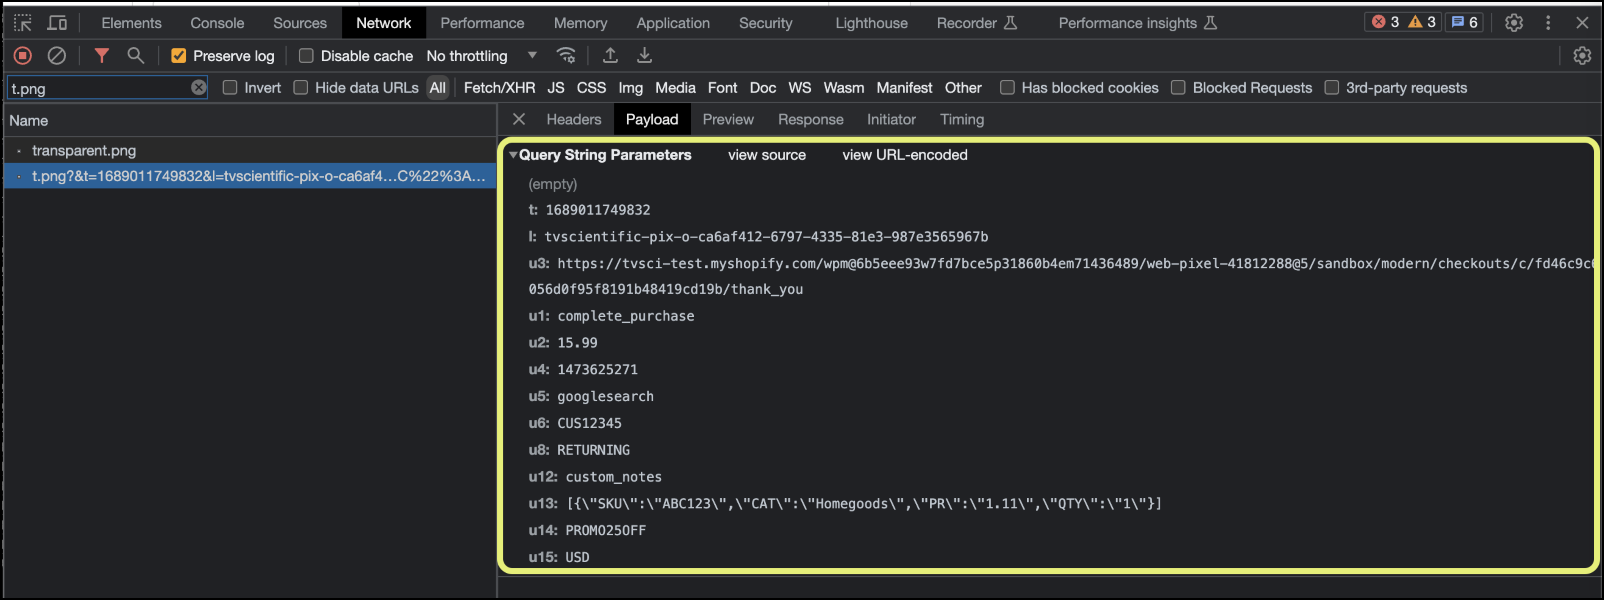
UNIVERSAL TRACKING PIXEL Examine the request URL to ensure that all parameters are present and correct.
UNIVERSAL TRACKING PIXEL On the Payload tab, make sure that the tvScientific ID is correctly populated.

Repeat these steps for all pages on your website.
Use the Last 100 Events report
This report is available in the Tracking module and is a powerful tool to check website pixel implementation. We highly recommend that you export and review.
If you're sending the report to a client using an STP or Amazon S3 bucket, you’ll need the credentials to set this up. Please obtain these credentials before contacting your NBCU account rep.
The Last 100 Events report is updated once/day.
All times on the report are EST time zone.
This report has a line max of 5,000. If needed, use the Outcome Filter to filter by tracking pixel.
The following list contains the most common things you should verify using this report. For solutions, see Common QA problems and solutions.
Complete registration pixel: verify that the Order ID is populating
Lead generated pixel: make sure that the Order ID is populating
Complete purchase pixel:
Order totals/dollar amounts: Confirm that the orders pulling into this column make sense. For example, if you sell $100 items, you shouldn’t expect to see orders for $1.
Order ID: Check that this is populating and determine if there are duplicate orders.
IP Address: This is used in tandem with Order ID to determine if the Complete purchase pixel is firing multiple times. If you see the same Order ID and same IP address, it’s safe to assume that the pixel is firing multiple times - especially if there are a lot of purchases under the same IP.
Referring URL: This should be the same URL that appears before the page where you expect your billable event pixel to fire.
If you’re using Shopify, you may see additional columns populate, such as Customer ID, Customer Status, Item Data, and Promo Code. This doesn’t indicate a problem.
Common QA problems and solutions
Problem | Solution |
Duplicate order IDs and/or IP addresses | This indicates duplicate pixels are firing. If you see the same Order ID and same IP address, the pixel is firing multiple times, especially if there are lot of purchases displaying under the same IP. Double-check the implementation and remove duplicate pixel snippets. |
Pixel isn’t firing | Sometimes extra spaces are copied as part of the snippet. Check for extra spaces before or after the snippet and remove them. |
Complete purchase pixel shows “cart” in the URL (Referring URL parameter) | The Complete purchase pixel may be implemented on the wrong page. When implemented correctly, the URL will typically include the word “checkout.” If you’re an eCommerce client or the URL includes the word “cart”, check to see if the Complete purchase pixel was implemented on the Start Checkout page (incorrect) versus the Complete purchase page (correct). |
Last 100 Events report is displaying unexpected information | Your pixel(s) may be missing or implemented incorrectly. Contact your developer with the details. See Use the Last 100 Events report for examples of what to verify. |
